3DHOP
3D Heritage Online PresenterHow To
Description
This page introduces the 3DHOP basic function "Set Scene", showing the minimal elements necessary to load a 3D mesh.
Featured Scene Elements
- Meshes
- ModelInstances
Models loading
Click to run live demo
The 3DHOP beating heart: the “Set Scene” setup
Set Up
3DHOP is designed so that the definition of the scene and the basic interaction parameters are controlled using a declarative approach (like most of HTML programming). A JSON data structure is filled with the description of the scene and passed to the 3DHOP entity when the viewer is created and initialized. The "setup3dhop" function is used to create and initialize the viewer; it is called when the page is loaded and ready to be displayed. first of all, a new "presenter" object (the actual 3DHOP viewer) is created, passing to it the id of the HTML5 canvas ("draw-canvas") where the drawing will take place. Then, in the "setScene" function, the scene and viewer components are created and configured:
var presenter = null;
function setup3dhop() {
presenter = new Presenter("draw-canvas");
presenter.setScene({
meshes: {
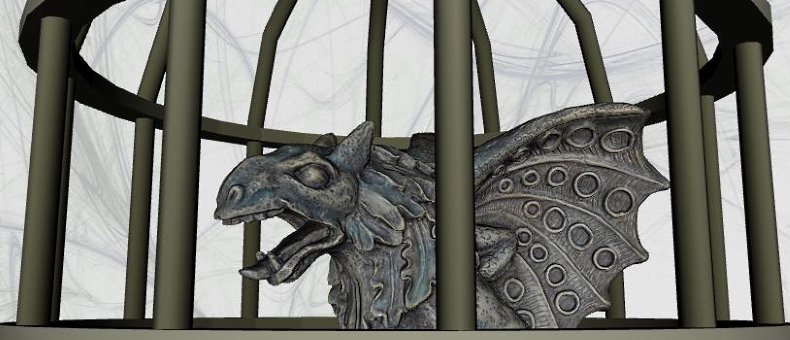
"Gargoyle": {
url: "models/gargo.nxs"
}
},
modelInstances: {
"Model1": {
mesh: "Gargoyle"
}
}
});
}
As is shown in the above block of code, the function "setScene" has as a parameter a JSON structure, organized as a series of descriptive modules, each one specifying some components of the scene and the viewer.
This structure can contain many different elements; for this tutorial, however, we will only describe the essential ones to load and visualize 3D models: "meshes", used to specify 3D geometries loading them from files, and "modelInstances", used to create 3D renderable objects in the scene.
In the "meshes" section, we create a "mesh" object for each 3D model we want to load from a file, specifying a unique name ID (in the previous example, "Gargoyle") and an URL where the model can be accessed (in the previous example, "models/gargo.nxs"). The meshes declared here may be then used to create renderable objects in the scene, or hotspots (see the hotspot tutorial).
In the "ModelInstances" section, we define the 3D objects that will be displayed by the 3DHOP viewer. Again we specify a unique name ID for the instance (in the previous example, "Model1"), and tell the system which is the 3D model to use when rendering this instance (in the previous example, the "Gargoyle" mesh declared in the "meshes" section). More parameters may be specified to further configure the instance, but we will explain them in the next tutorials.
3DHOP uses this "two level" model management, first creating "meshes" loading a 3d file, and then using these meshes to instantiate actual renderable objects. This seems complicated, at a first glance, but provides a good degree of flexibility: by using this method it is possible to create multiple copies of the same geometry (without loading the same file twice), and use meshes to create both renderable geometries and hot-spots.
In the above code example the 3D model loaded is in the Nexus format; of course if we want to load a Ply mesh the procedure remains the same, as shown here:
var presenter = null;

function setup3dhop() {
  presenter = new Presenter("draw-canvas");

  presenter.setScene({
    meshes: {
      "Cage": {
        url: "models/cage.ply"
      }
    },
    modelInstances: {
      "Model1": {
        mesh: "Cage"
      }
    }
  });
}
3DHOP can manage multiple 3D models at the same time; it is possible to mix different formats and kind of geometries (multi- and single- resolution, or point clouds).
To simultaneously load two or more meshes in the same scene you have to specify their file path one after the other in the "meshes" field,
and then to do the same with the instances of these meshes in the "modelInstances" field. The block of code presented here, with the simultaneous loading of a multi-resolution NEXUS and a single resolution PLY model, is the one shown in the example at the beginning of this page.
var presenter = null;

function setup3dhop() {
  presenter = new Presenter("draw-canvas");

  presenter.setScene({
    meshes: {
      "Gargoyle": {
        url: "models/gargo.nxs"
      },
      "Cage": {
        url: "models/cage.ply"
      }
    },
    modelInstances: {
      "Model1": {
        mesh: "Cage"
      },
      "Model2": {
        mesh: "Gargoyle"
      }
    }
  });
}
Before concluding, it is necessary to specify an important aspect of the 3DHOP models loading: all the meshes are loaded with the spatial orientation and scale saved in their source file. This means, obviously, that a model that is saved in its file with a non-straight orientation, (e.g. upside down, tilted) will be rendered inside 3DHOP with its own non-straight orientation. Or that if you load two models that are not in the correct position one with respect to the other (like the Cage and the Gargoyle), they will retain their uncorrelated positioning. Or that loading two models at a different scale, one will be bigger than the other. In these cases, to "compose" the scene by arranging the models around, it is possible to apply transformations to each mesh and instance (please refer to this HOWTO to know how), or you can modify the axis orientation, scale and positioning of the 3D models (and save it in their source file) before opening them inside 3DHOP.
The complete sources of this example are provided together the 3DHOP code in the download section.
If you want to learn more about how to choose and configure the trackballs that control the user interactions with the 3D scene, click here and go to the next HOWTO.